

An effective site search can mean better usability on your website. This can help improve your sales, or give your brand a competitive edge. Velo by Wix features two tools that allow you to create a custom site search experience for your site visitors.
With the wix-search API and Wix Site Search App, you can use the user's text input to search within your site and display sorted and/or filtered results in a repeater element on a page.
The Search API currently supports Wix site pages that are indexed by default or Wix content apps such as Blogs, Stores, Forum and Bookings. This article will focus on a search for blog posts via Wix Blog.
To enable Search API functionality for your site, you must add the Wix Site Search application to your site. You can add the app from the “Add” panel (labeled with “+”) in the Editor or from the Wix App Market.
How to access Wix Site Search app from the Editor
After installing the app, you can delete the default Search Bar, but make sure to leave the Search Results page on your site. You can’t use the Search API to control the Wix Search Bar or Search Results page.

Removing default elements after installation
To use the wix-search API, import wixSearch from the wix-search module:
import wixSearch from 'wix-search';The Set Up
Be sure to turn on Dev Mode. This will enable Velo, Wix’s full-stack development platform which contains its own built-in IDE.

Dev Mode in the Editor
Install the Wix Blog App to your site. The installation will come with sample posts, but feel free to make it your own.
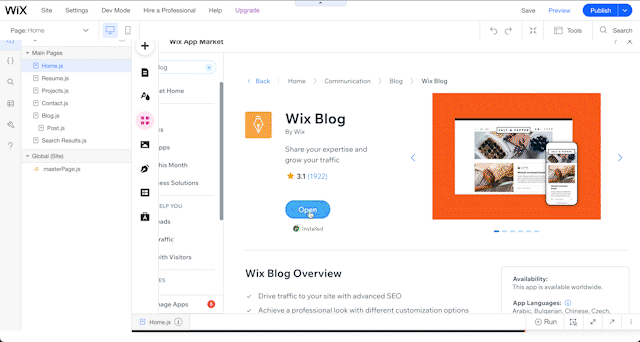
How to access Wix Blog app from the Editor
Add necessary UI elements to your page. You will need an input element as the search bar to access the Search API functionality. You can add elements from the “Add” panel (labeled with “+”) in the Editor.

How to add elements from the Editor
Building The Search
The Search API queries support site documents and returns matching results in Document form.
Start by importing the wixSearch from the wix-search module which contains functionality for searching a site.
In your onReady() function, add the onKeyPress() function to the search bar element that will initiate the search on “Enter”.
Next, you’ll use wixSearch with the search() function to create a search builder using the text input to search your desired pages and return any matching results.
$w.onReady(function () {
    $w("#searchBox").onKeyPress((keyPress) => {
        if (keyPress.key === "Enter") {
            const textInput = $w("#searchBox").value;
            wixSearch.search(textInput)
                .documentType("Blog/Posts")
                .find()
                .then((results) => {
                    if (results.documents.length > 0) {
                        let posts = results.documents;
                        $w('#repeater1').data = posts;
                        console.log(posts)
                    } else {
                        console.log("No results found!");
                    }
                })
                .catch((error) => {
                    console.log(error);
                });
        }
    });
});
Making It Custom
Your site search will become more refined as you add functionality to your search builder. This example uses the ascending() function to sort specified fields in the Blog collection in ascending order.
You can sort your search results using the following types:
Number: Sorts numerically.
Date: Sorts by date and time.
String: Sorts lexicographically, so "abc" comes after "XYZ".
Boolean: false comes after true.
If you specify more than one field, ascending() sorts the results in ascending order by each field in the order they are listed.
wixSearch.search(textInput)
    .documentType("Blog/Posts")

    // sort ascending by date published
    .ascending('publishDate')

        .find()
        .then((results) => {
            if (results.documents.length > 0) {
                let posts = results.documents;
                $w('#repeater1').data = posts;
                console.log(posts)
            } else {
                console.log("No results found!");
            }
        })
        .catch((error) => {
             console.log(error);
        });
Handling The Results
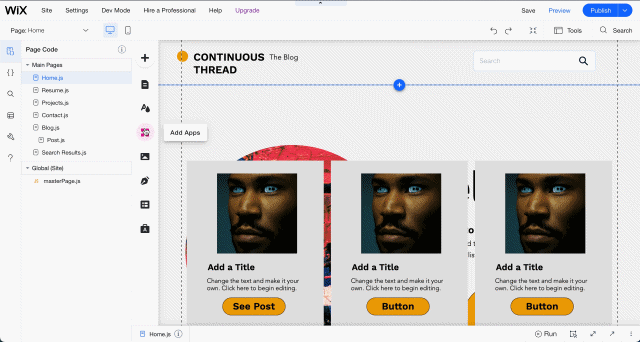
Now that you have built a custom site search, let’s take it one step further and display the results inside of a repeater element on your website.

View of the repeater element
This repeater contains an image element, a button that links to the page of the selected post, and two text elements: one for the title and one for the description. You can add the repeater and all other elements from the “Add” panel (labeled with “+”) in the Editor.
$w.onReady(function () {

    // Set repeater data as empty before each run
    $w('#repeater1').data = [];

    $w("#searchBox").onKeyPress((keyPress) => {
        if (keyPress.key === "Enter") {
            const textInput = $w("#searchBox").value;
            wixSearch.search(textInput)
                .documentType("Blog/Posts")
                .ascending('publishDate')
                .find()
                .then((results) => {
                    if (results.documents.length > 0) {
                        let posts = results.documents;
                        $w('#repeater1').data = posts;
                        console.log(posts)
                    } else {
                        console.log("No results found!");
                    }
                })
                .catch((error) => {
                    console.log(error);
                });
        }
    });

    // Populate data for repeater
    $w("#repeater1").onItemReady(($item, itemData) => {
        $item("#image2").src = itemData.image;
        $item("#title").text = itemData.title;
        $item("#description").text = itemData.description;
        $item("#button3").link = itemData.url;

    });

});
Inside of your code, you will set the repeater data as empty before the search runs.
After the search is complete and returns your query, populate the repeater element inside of your onItemReady() function with the data you wish to display.
Check out our live demo site here to see this example in action.


