- Editorial Team
- Jan 24, 2021
- 4 min read
Updated: Feb 27, 2023
Since the world moved indoors, the need to communicate ourselves surged to new levels: The ability to convey ideas and processes became suddenly necessary in personal, academic, and professional relationships. Creatives and designers faced the need to communicate things visually: creative processes, project evolutions, mockups, or zoom meetings. And design students, in particular, needed to create images that show their character and aesthetic approach - in other words, to art direct - in many cases without "proper" equipment. To help design students and junior designers in creating the right settings in their own space to designing character-filled images, here's your guide to Art Direction from home.
You will learn both how to document everyday moments or create portfolio-level visuals, led by insights of Avigail Tehori, a mentor and manager of Wix's Content Media team. Avigail works with multiple art directors, photographers, and designers, helping them to identify their style and aesthetics - which she translated into this step-by-step manual. She is responsible for curating and creating visual content for Wix products and its Media Manager, and lead countless and various production.
Discovering Your Art Director's Voice
Before getting to work, Avigail wants to address two misguided assumptions about art directing: it's not a linear process, she says, and it's not (only) based on intuition. "The process requires you to constantly go back and forth - looking for references, planning, trying, and then improving." The process relies heavily on visual analysis - breaking elements apart, sensitivity to fashion, lifestyle, and design trends.
Starting out, she encourages you to explore and transition between different styles. Remember that you're setting up a photoshoot from home, which means more limitations than a studio environment. To help you get started, fill these in:
The equipment you have
The limitations of your space
The objects that are available for you
These should help you determine what reference is best suited for you, right now.
Examples: Showing creative processes, or setting up a work environment.


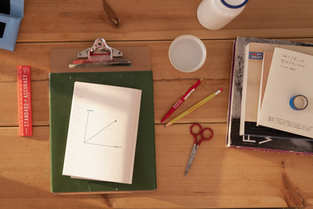


Photography: Michal Luft; Art Direction: Raya Cohen
1: Finding References and Inspiration:
To develop your own signature art direction style, start by choosing references that suit you and your work. Pay close attention to aesthetics - look & feel, style - but also look for the expression and meaning in images you're drawn to. Notice the styling, composition, and props in your references.
2: Analyze Your Reference:
A: Style Analysis
Analyze the general atmosphere in your reference and observe its signature elements: retro, edgy, colorful, or fun.
B: Visual Analysis
Break your reference down into visual guidelines. Start by noticing the relation between surface and background, and move on from there:
Is there a surface (floor, table, stand)? Are the front and back of the image merging?
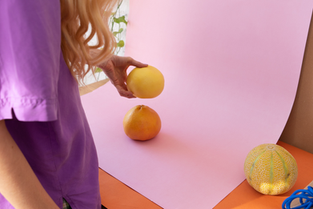
What materials were being used? Look at textiles (rugs, fabrics), typeface, hands, people, fruits; analyze the use of color.
How is light being used (dramatic lighting, daylight, dark, or shadows)?
Considered all of these questions? Congratulations, you have yourself a style guideline.


Photography: Michal Luft; Art Direction: Raya Cohen
3: Design Your Guideline:
Your guideline is a set of rules. And now that you have rules, you can (carefully) start breaking them.
Change colors or objects; change the light, create a new composition, insert new elements for the work. Be careful with breaking too many rules at once - so you're still cohesive and consistent.
4: Using Props
Choose the props and objects you're going to use.
Take some test pictures of your objects that will lead you to the next step ->
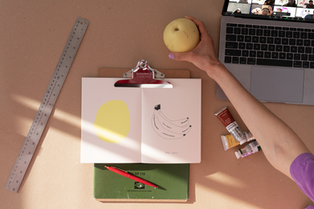
Example: Using props, and working with backgrounds


Photography: Michal Luft; Art Direction: Raya Cohen
5: Create a Composition:
To create a composition, (1) find inspiration for a composition you're interested in and (2) create a storyboard. The storyboard should include a mix of different camera directions with the same object. This will ensure that you'll get a variety of compositions using the same setup.
6: Design Your Light
Light is your most important instrument, so make sure you've chosen references that fit the equipment you have available.
Working with daylight: Plan the location, test the light during different hours of the day. You can choose a cloudy day or a sunny morning to create dramatic shadows or create effects using sunlight.
Create your own light: Darken your room and test out your available lights. Consider whether the light is soft or sharp, and play with creating filters made of see-through pages.
Whatever you choose, remember, good lighting is EVERYTHING.
Example: Nighttime workspace using smartphone flash.


Photography: Michal Luft; Art Direction: Raya Cohen
7: Create your set
Be flexible with what you've planned - even if you have a particular result in mind, be adaptable and try out new things.
Always take some background images without any objects, so you can use them later for photoshop. Also, take short videos/time-lapse videos during your setup.
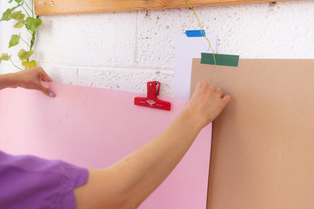
Example: Artwork or reading material documentation using a smartphone flash.


Photography: Michal Luft; Art Direction: Raya Cohen
That's it - you're all set, now you can document everything - from a zoom meeting, your working environment, project you've been working on, daily moments, or even the evolution of your portfolio website.
If you found this manual useful, share your work and tag us! @wixplayground